对抗攻击赛题TOP1技术报告
A.得分情况
最终本赛题总得分:17925
其中白盒场景有效性得分: 8146 ;白盒场景隐蔽性得分: 6600;拟态场景有效性得分: 1889 ;拟态场景隐蔽性得分: 6600。

B.攻击实现流程
1.攻击方法简介
对于本题的对抗补丁,因为没有限制patch的数量和形状我们采用了集中和分散相结合的方式来设计patch,具体而言patch是基于box位置的均匀分布的横杠,初始化为灰色。对于yolov3模型,设定每个box的得分作为损失函数,通过符号梯度下降(svg)的方法实现对于图片的优化,达到最好的攻击效果。
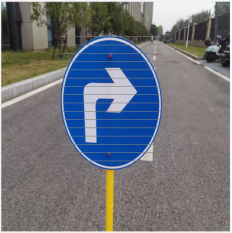
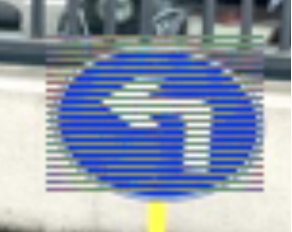
如下图所示,图1是刚初始化即可攻击成功的对抗样本,图2是优化多轮后的对抗样本,可以看出像素点的颜色变化。
2.攻击流程
下面从补丁位置确定、补丁形状选取、loss损失函数选取、优化方法选择方面说明攻击流程。这几个部分一一确定的过程就是整个攻击实施的流程。
1.补丁位置确定
这里我们本来是想基于DPatch的工作创建一个方形的patch并且就放在左上角,但是后面参考了一些国内外的其他比赛和文献之后还是确定了patch的位置正好应该是图片中物体检测框的位置。在比赛中我们采取了在攻击脚本中调用模型的预测功能来实现对要攻击图片中物体的定位(这里其实有点傻,当时没注意到在attacked_images_file.txt直接给了框的坐标)。
有关的实现代码为:
1
2
3
4
5
6
7
8
9
10
11
12
13
14
15
| def detect_box(self, img):
image_shape = [416, 416]
img = img.to(device)
img = torch.autograd.Variable(img)
outputs = self.net(img)
outputs = self.bbox_util.decode_box(outputs)
results = self.bbox_util.non_max_suppression(torch.cat(outputs, 1), self.num_classes, self.input_shape,
image_shape, self.letterbox_image, conf_thres = self.confidence, nms_thres = self.nms_iou)
top_boxes = results[0][:, :4]
return top_boxes
|
2.补丁形状选取
这一步我们其实经历了很多探索和挫折,这里先只放出最后的结果,原因在最后一部分再做解释。
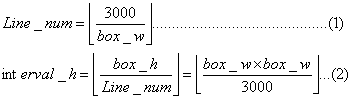
我们选取的patch是在box中尽量均分的横线,每条横线的长度与box的宽度相同,每条横线的宽度为1。同时满足这些横线占用的像素点总数尽量靠近3000,但是需要注意的是,有些box的大小本身不足3000,会出现完全遮挡box的情况,所以我们需要控制每两条横杠之间的距离大于1,如下面的图3和图4所示。
综上,我们使用下面的公式确定横线的条数和没两条横线之间的距离:
其中,Line_num表示横杠的条数,interval_h表示每两条横杠上端的距离。
使用上面的算式,从y坐标为box的最高处的坐标开始画横杠我们就可以确定出整个patch的样子,我们在代码中用mask表示这个形状mask[i,j]=1表示该处的像素点可以被修改,也就是patch所在的地方。相关的代码如下所示:
1
2
3
4
5
6
7
8
9
10
11
12
13
14
15
16
17
18
19
20
21
22
23
24
25
26
27
28
29
30
31
32
33
34
35
36
37
38
39
40
41
42
43
44
45
46
47
48
49
50
| '''
创建全是横杠的patch
'''
def create_plan_mask(yolo, net, img_path, box_scale, shape=(416, 416)):
mask = torch.zeros(*shape, 3)
img = Image.open(img_path).convert('RGB')
resize_small = transforms.Compose([
transforms.Resize((416, 416)),
])
img1 = resize_small(img)
boxes = yolo.detect_box(img=img1)
grids = boxes
(y1, x1, y2, x2) = boxes[0]
x1 = int(np.clip(x1, 0, 415))
x2 = int(np.clip(x2, 0, 415))
y1 = int(np.clip(y1, 0, 415))
y2 = int(np.clip(y2, 0, 415))
box_h, box_w = y2 - y1, x2 - x1
pixel_num = 3000
interval_h = int(box_w * box_h / 3000) + 1
if interval_h <= 1:
interval_h = 2
pixel_changed = 0
for i in range(int(box_h / interval_h)):
for j in range(box_w):
y = int(y1 + i * interval_h)
x = int(x1 + j)
if y < shape[0] and x < shape[1]:
mask[y, x, :] = 1
pixel_changed = pixel_changed + 1
if(pixel_changed >= 3000):
break
if(pixel_changed >= 3000):
break
print(pixel_changed)
with open('log.txt', 'a') as log_file:
log_file.write(f'File: {img_path}, Pixels Changed: {pixel_changed}\n')
return mask
|
3.loss损失函数选取
我们采用直接从输出中获取每个类的得分作为对抗样本优化的损失函数,代码如下所示(其实我们觉得还可以再优化,后面的部分再说):
1
2
3
4
5
6
7
8
9
10
11
| def get_cls_scores(self, img:torch.tensor):
img = _input_transform(img).to(device)
output = self.net(img)
scores = []
for item in output:
h, w = item.shape[-2], item.shape[-1]
item = item.reshape(-1, 5+20, h*w).permute(1,0,2).reshape(5+20, -1)
scores += [item[4, :].sigmoid()]
return scores
|
4.优化方法选择
选择最简单的符号梯度下降方法对前面生成的mask中的每个像素进行反向传播和优化,有关代码如下所示:
1
2
3
4
5
6
7
8
9
10
11
12
13
14
15
16
17
18
19
20
21
22
23
24
25
26
27
28
29
30
31
32
33
34
35
36
37
38
39
40
| def specific_attack(yolov3_helper, img_path, mask, save_image_dir):
img = cv2.imread(img_path)
img = torch.from_numpy(img).float()
t, max_iterations = 0, 600
eps = 1
w = torch.zeros(img.shape).float() + 127
w.requires_grad = True
success_attack = False
min_object_num = 1000
min_img = img
while t < max_iterations:
t += 1
patch_connecticity = torch.abs(get_delta(w) - img).sum(-1) == 0
patch = get_delta(w)
patch[patch_connecticity] += 1
patch_img = img * (1 - mask) + patch * mask
patch_img = patch_img.to(device)
attack_loss, object_nums = yolov3_helper.attack_loss(patch_img)
if min_object_num > object_nums:
min_object_num = object_nums
min_img = patch_img
if object_nums == 0:
success_attack = True
break
if t % 20 == 0:
print("t: {}, attack_loss:{}, object_nums:{}".format(t, attack_loss, object_nums))
attack_loss.backward()
w = w - eps * w.grad.sign()
w = w.detach()
w.requires_grad = True
min_img = min_img.detach().cpu().numpy()
with open('log_t.txt', 'a') as log_file:
log_file.write(f'File: {img_path}, t: {t}\n')
save_path = os.path.join(save_image_dir, img_path.split("/")[-1])
if not success_attack:
save_path = save_path.replace(".", "_fail.")
cv2.imwrite(save_path, min_img)
return success_attack
|
C.攻击样例
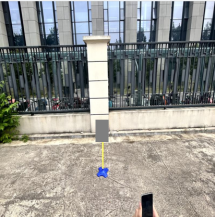
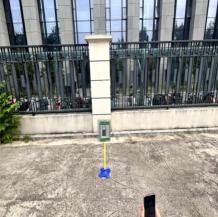
这里展示一个yolov3中白盒攻击成功的样本,一个失败的样本(一共只有五个)如图5、图6、图7所示:
D.攻击分析
有关我们方法的优势,总结为以下几点:
1、在yolo白盒场景下攻击性能极好,能达到几乎100%的攻击成功率
2、方法泛化性能良好,很多刚初始化的灰色patch就能完成攻击
3、方法添加的灰色patch特征不明显,隐蔽性好,相应的得分更高
4、优化速度高